
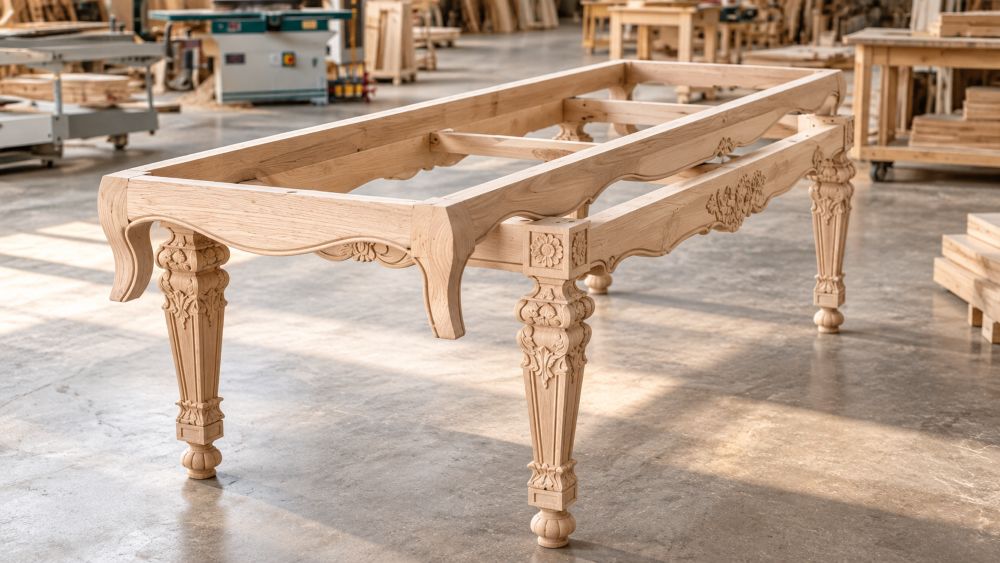
Attaching wooden table legs securely requires more than strong screws or bolts. Even well-made solid wood legs can wobble if their connections cannot adequately resist sideways movement, especially on taller dining tables. A properly designed table apron frame helps improve stability by supporting the legs and reducing unwanted movement.
In this guide, we’ll explain why wooden tables wobble and how to attach table legs securely using three proven methods: mortise-and-tenon joints, wooden corner blocks with bolts, and metal corner braces. We’ll also compare their advantages, limitations, and suitable applications to help you choose the right connection for your project.
1. Why Do Table Legs Wobble?
Before repairing or assembling a table, it is important to distinguish between three different types of instability.
Uneven Floors or Unequal Leg Lengths
If one leg does not contact the floor properly, the table may rock diagonally when pressure is applied.
This can result from an uneven floor, differences in leg length, or a twisted frame.
Strengthening the leg joints will not necessarily solve this problem. First, check the table on a reasonably level surface and confirm that all four legs make contact.
Loose Leg Connections
Loose bolts, damaged threads, poorly fitted joints, or inadequate fastening hardware can allow movement where the legs meet the frame.
Even a small amount of rotation at the top of a long table leg may produce noticeable movement lower down.
Frame Racking
Racking occurs when a rectangular frame distorts sideways under a horizontal force.
A table may feel firm when pressed downward but move noticeably when pushed from the side.
Properly designed aprons and corner joints help the frame resist this type of deformation.
2. Why Are Long Table Legs More Difficult to Stabilize?
The longer a table leg is, the more important the stiffness of its connection becomes.
A sideways force creates a bending moment at the attachment point. In a simplified example:
Bending Moment = Force × Distance
A 20 N sideways force applied 700 mm below a connection produces a bending moment of 14 N·m.
The same force applied 200 mm below the connection produces only 4 N·m.
This helps explain why a mounting method suitable for a short cabinet foot may not be appropriate for a long dining table leg.
Actual furniture behavior is more complex. Leg dimensions, wood species, frame geometry, joint design, and the way loads are transferred through the table all affect stability.
For long wooden legs, a reliable connection must resist not only separation from the supporting structure but also unwanted rotation and sideways movement.
3. Method One: Table Aprons with Mortise-and-Tenon Joints
For experienced woodworkers building traditional solid wood furniture, mortise-and-tenon joints combined with sturdy table aprons are often an excellent choice.
This method creates a permanent wood-to-wood connection between the legs and the supporting frame.
How Mortise-and-Tenon Joints Work
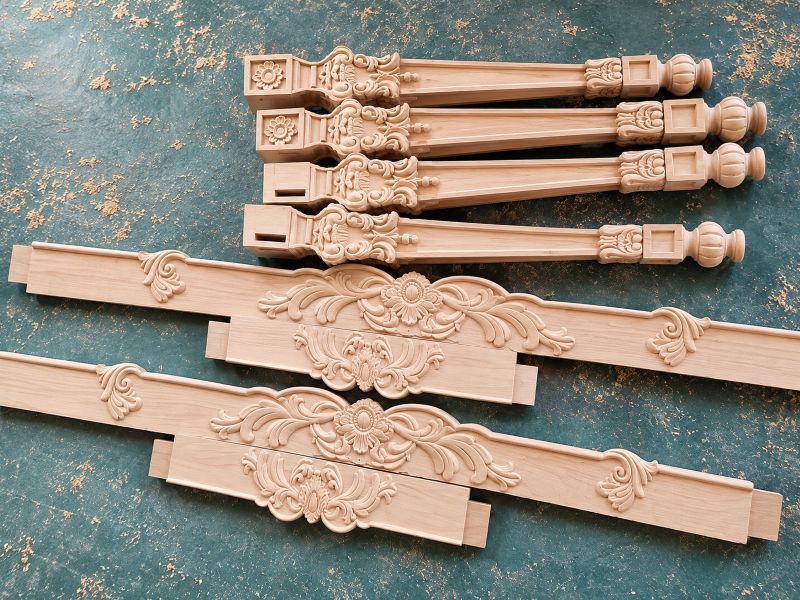
A mortise is a precisely cut cavity in the table leg. A tenon is a projecting section formed at the end of the apron.
The tenon fits into the mortise, typically with suitable woodworking adhesive for permanent construction.
When sideways forces act on the table, the tenon, mortise walls, joint shoulders, and aprons work together to resist movement.
The shoulders—the surfaces where the apron meets the leg—are particularly important because close-fitting contact helps limit rotation at the joint.
How to Attach Table Legs Using Mortise-and-Tenon Joints
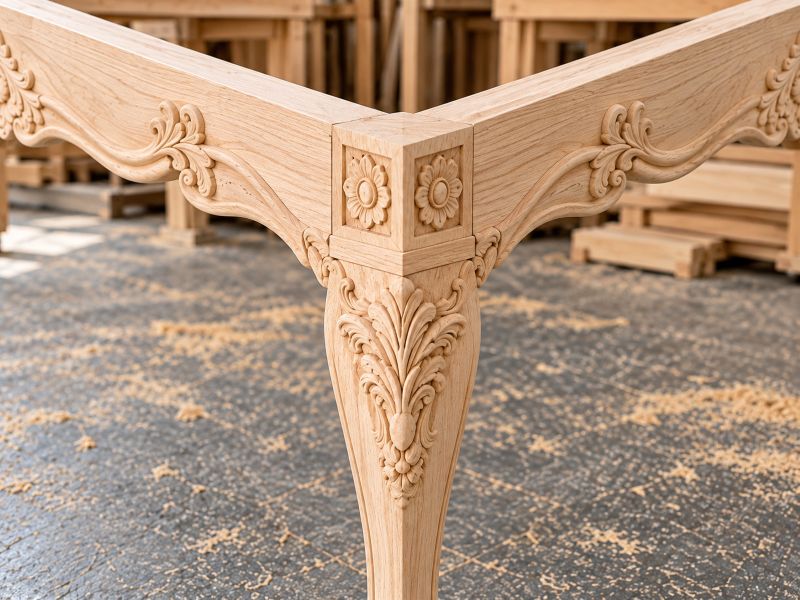
Step 1: Plan the joint dimensions.
Determine the table height, apron depth and thickness, and the dimensions of each leg’s square top block.
For turned wooden table legs, the square top section must provide enough material for the mortises while leaving sufficient wood around and between adjoining joints.
Step 2: Mark the mortises.
Mark the positions of the adjoining aprons on each leg using consistent reference faces.
Check the layout carefully to ensure the joints align correctly.
Step 3: Cut the mortises and tenons.
Use suitable equipment, such as a mortising machine, router with a jig, or traditional hand tools.
Aim for a close, controlled fit. A loose joint may lack stiffness, while an excessively tight joint may damage the wood during assembly.
Step 4: Dry-fit the frame.
Assemble the legs and aprons without glue.
Check that the tenons seat properly and that the shoulders contact the leg surfaces evenly.
Measure the frame diagonally to check squareness and correct any misalignment.
Step 5: Glue and clamp the joints.
Apply a suitable woodworking adhesive according to the manufacturer’s instructions.
Assemble and clamp the frame while checking alignment and shoulder contact.
Allow the adhesive to cure fully before loading the structure.
Step 6: Attach the tabletop.
Use an attachment system appropriate for the tabletop material.
For a wide solid wood tabletop, choose fasteners or slotted mounting arrangements that allow seasonal cross-grain movement.
Important Design Considerations
Mortise-and-tenon construction requires accurate joint proportions.
Two mortises meeting at the same table leg must not remove so much material that the remaining wood becomes inadequate.
The apron also needs sufficient depth and thickness to contribute meaningful stiffness to the frame.
Simply increasing the size of the tenon or apron does not automatically create a better joint. The complete geometry and wood grain direction must be considered.
When to Choose This Method
Mortise-and-tenon joints are particularly suitable for traditional dining tables, custom hardwood furniture, and projects intended for permanent assembly.
Their main limitations are the woodworking skill, equipment, and machining accuracy required.
They are less convenient when the legs need to be repeatedly removed.
4. Method Two: Table Aprons with Wooden Corner Blocks and Bolts
Wooden corner blocks combined with bolts offer a practical alternative for tables that need removable legs.
Instead of permanently gluing the legs to the aprons, this method uses a mechanical connection to draw the legs firmly against the surrounding frame.
How Wooden Corner Blocks Work
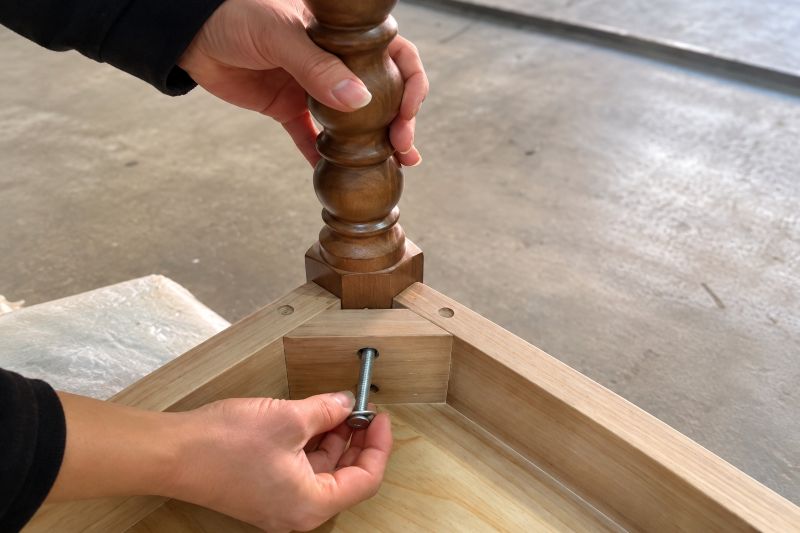
A wooden corner block is positioned diagonally across the inside corner formed by two adjoining aprons.
A bolt passes through the block and engages a suitable threaded fitting in the table leg.
As the bolt is tightened, the leg is drawn against the apron ends.
The bolt supplies clamping force, while the leg-to-apron contact surfaces and supporting frame help resist relative movement.
The corner block must be securely connected to the aprons to perform its intended function.
How to Attach Table Legs Using Wooden Corner Blocks
Step 1: Prepare the apron frame.
Cut the aprons accurately and ensure their ends fit against the square top sections of the legs.
Plan how the aprons will remain aligned and supported when the legs are removed.
Step 2: Make the corner blocks.
Use suitable, sound wood and provide sufficient material around the bolt holes and other fasteners.
The blocks should fit accurately against the adjoining aprons.
Step 3: Attach the blocks to the aprons.
Secure the blocks using an appropriate fastening or joinery arrangement.
Pre-drill screw holes when necessary to reduce splitting.
Ensure the blocks are positioned correctly and the frame remains square.
Step 4: Prepare the bolt connections.
Drill the bolt holes and install suitable threaded fittings in the legs, or use another compatible mechanical connection.
Check that the holes and threaded components align accurately.
Step 5: Install the legs.
Position each leg against the adjoining apron ends.
Insert and tighten the bolt gradually, drawing the leg firmly against the frame.
Check for full contact and correct alignment. Avoid overtightening.
Step 6: Inspect the assembly.
Check the frame for squareness, examine the corner connections, and test for unwanted movement.
Attach the tabletop using an appropriate fastening system.
Why the Fit Matters
The bolt should not be expected to resist every sideways force by itself.
If the apron ends do not seat properly against the leg, the connection may move even when the bolt feels tight.
Accurate contact surfaces and a well-constructed frame are essential.
Some removable furniture systems also use locating features or additional joinery to improve alignment and reduce movement.
When to Choose This Method
Wooden corner blocks and bolts are especially useful for knock-down dining tables, furniture shipped with removable legs, and custom furniture requiring on-site assembly.
They offer a practical balance between structural support and assembly convenience.
5. Method Three: Table Aprons with Metal Corner Braces
Metal corner braces provide another practical way to attach wooden table legs, particularly when removable connections are required.
One common design is a one-piece V-shaped metal corner bracket that connects two adjoining table aprons to the table leg.
Unlike small individual angle brackets, this type of hardware spans the inside corner of the apron frame and creates a mechanical connection between all three wooden components.
How V-Shaped Metal Corner Braces Work
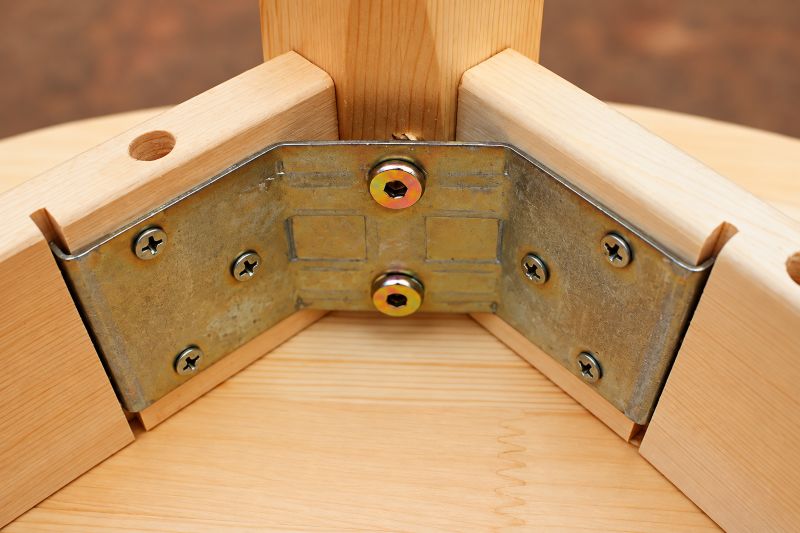
A V-shaped metal corner brace is formed from a single piece of metal, with two angled wings that fit against the inside faces of adjoining table aprons.
Wood screws secure the two wings to the aprons, while bolts positioned near the center of the bracket connect it to the table leg.
When the fasteners are properly installed, the bracket helps hold the aprons and leg together and limits unwanted relative movement.
The metal bracket, bolts, screws, apron frame, and leg-to-apron contact surfaces work together to support the connection.
The stiffness and reliability of this arrangement depend on the bracket thickness, formed geometry, fastener specifications, wood strength, and quality of installation.
How to Attach Table Legs Using V-Shaped Metal Corner Braces
Step 1: Prepare the Table Aprons
Cut the table aprons accurately and check that their ends fit properly against the square top section of the table leg.
Confirm that the apron dimensions and overall frame construction are suitable for the intended table.
Step 2: Select a Compatible V-Shaped Corner Bracket
Choose a one-piece metal corner bracket specifically designed for furniture leg connections.
Check its dimensions, metal thickness, mounting-hole positions, and compatibility with the table aprons and leg.
The bracket should fit the inside corner without forcing the adjoining wooden components out of alignment.
Step 3: Position the Metal Corner Bracket
Place the bracket across the inside corner formed by the two adjoining aprons.
Position its two wings against the inside faces of the aprons, with the central section aligned with the table leg.
Check that the bracket seats correctly and that its fastening holes are properly positioned.
Step 4: Secure the Bracket to the Aprons
Mark and prepare the screw holes according to the hardware manufacturer’s instructions.
Use suitable wood screws to fasten both wings of the bracket to the adjoining aprons.
Ensure that the screws engage sufficient sound wood and do not split the aprons.
Step 5: Connect the Bracket to the Table Leg
Prepare compatible threaded connections in the table leg.
Insert the required bolts through the central mounting holes of the metal bracket and engage the threaded fittings in the leg.
Tighten the bolts evenly, drawing the components into their intended positions.
Check that the apron ends fit securely against the leg and that the bracket is not distorted during tightening.
Step 6: Inspect the Completed Assembly
Check that all screws and bolts are properly secured.
Inspect the alignment of the leg and aprons, and test the frame for unwanted sideways movement.
Attach the tabletop using a suitable mounting system that accommodates seasonal wood movement where necessary.
Why Choose a One-Piece V-Shaped Corner Bracket Instead of Separate L-Brackets?
A one-piece V-shaped bracket connects both adjoining aprons through a continuous metal component.
This arrangement can help coordinate the movement of the two apron connections and provide a more integrated corner assembly.
Separate L-shaped brackets generally create individual connections between adjoining wooden components.
However, the V-shaped bracket is not automatically stronger than every L-shaped bracket.
Actual performance depends on metal thickness, bracket geometry, fastener arrangement, wood strength, and the complete table design.
For long wooden table legs, the goal is to select a connection that provides adequate resistance to rotation and sideways movement, rather than simply choosing hardware based on its shape.
When to Choose This Method
V-shaped metal corner braces are useful for certain knock-down tables, removable wooden legs, and furniture projects requiring convenient mechanical assembly.
They can reduce the need for complex traditional joinery, although accurate fitting and suitable hardware remain essential.
For experienced woodworkers building permanent traditional furniture, properly designed mortise-and-tenon joints remain an excellent alternative.
6. Which Table Leg Attachment Method Should You Choose?
| Attachment Method | Main Advantage | Main Limitation | Suitable Applications |
|---|---|---|---|
| Aprons + Mortise-and-Tenon Joints | Rigid traditional wood-to-wood connection | Requires accurate joinery; not intended for frequent disassembly | Professional woodworking and permanent solid wood tables |
| Aprons + Wooden Corner Blocks and Bolts | Removable connection supported by the apron frame | Requires accurate fitting and secure block-to-apron connections | Knock-down dining tables and custom furniture |
| Aprons + One-Piece V-Shaped Metal Corner Braces | Connects both aprons and the table leg through a single metal bracket | Performance depends on bracket geometry, fasteners, and installation quality | Knock-down tables, removable legs, and suitable DIY furniture projects |
The key is to design the legs, aprons, joints, and fasteners as one complete structural system.
7. Why a Single Hanger Bolt May Not Be Enough
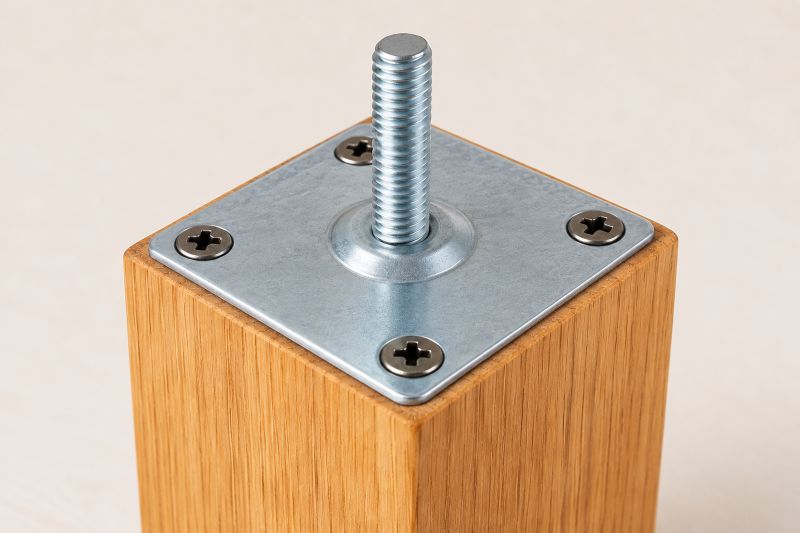
Hanger bolts are commonly used to attach wooden furniture legs.
They are convenient and can work well for many short furniture feet.
However, a long table leg attached with a single central hanger bolt and no adequate supporting structure may rotate slightly when subjected to sideways forces.
Repeated movement may loosen the connection or damage the surrounding material.
The problem is not necessarily the hanger bolt itself, but whether the complete connection provides sufficient resistance to rotation.
A hanger bolt used as part of a properly designed apron-supported system can contribute to a reliable assembly.
Likewise, a purpose-engineered mounting plate may be suitable for some long-leg furniture designs.
The attachment method should always be evaluated in the context of the complete table structure.
8. Common Mistakes When Attaching Wooden Table Legs
Even a well-designed table leg attachment can become unstable if important construction details are overlooked. Before assembly, avoid these common mistakes:
- Choosing the attachment method too late: Decide on the connection before manufacturing the legs. Square top-block dimensions, mortise locations, and mounting holes may depend on the selected method.
- Using an inadequate apron frame: Aprons that are too shallow, thin, or poorly connected may not provide sufficient resistance to sideways movement.
- Ignoring wood grain and fastener placement: Mortises that remove too much material or screws positioned too close to edges can weaken the wood and increase the risk of splitting.
- Relying only on tight bolts: Tightening hardware cannot compensate for poorly fitted joints or inadequate structural support.
- Restricting solid wood tabletop movement: Wide solid wood tabletops need suitable fasteners or slotted mounting arrangements to accommodate seasonal expansion and contraction across the grain.
Checking these details before final assembly can help prevent loose connections, frame movement, and avoidable repairs.
9. How to Fix a Wobbly Table
If your table wobbles, identify the source of movement before tightening bolts or adding reinforcement.
- Check the floor and leg contact. Place the table on a reasonably level surface and confirm that all four legs touch the floor. If the table rocks diagonally, check for uneven leg lengths, adjustable feet, or a twisted frame.
- Inspect the leg connections. Look for loose bolts, damaged threads, gaps between the legs and aprons, or failing wooden joints. Tighten or repair components as appropriate.
- Test for frame racking. Apply gentle sideways pressure and observe whether the legs move relative to the aprons or the entire frame distorts. This may indicate insufficient joint stiffness or inadequate structural support.
- Repair and retest. Address the identified problem, whether it requires adjusting leg contact, repairing joinery, replacing damaged hardware, or reinforcing the apron frame. Test the table again under normal expected use.
Important: Adding corner braces will not fix an uneven floor or a leg that is too short. The repair must address the actual cause of the wobble.
10. Plan the Connection Before Ordering Custom Wooden Table Legs
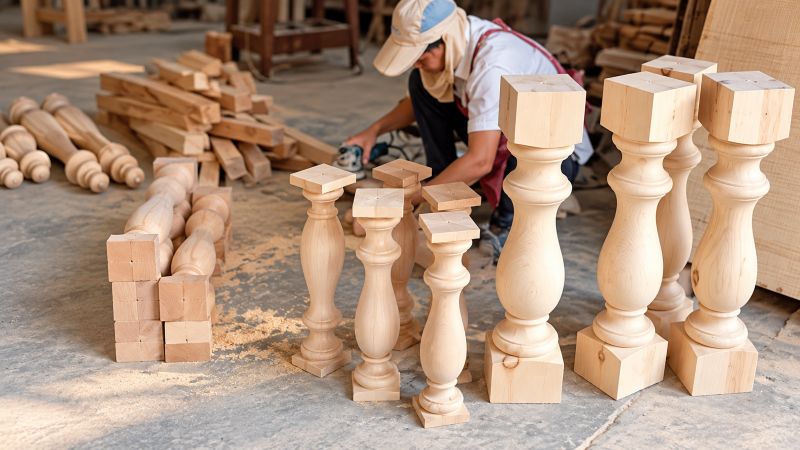
When ordering custom turned wooden table legs, customers often focus on height, diameter, wood species, and decorative profile.
However, the attachment method should also be considered before production.
For mortise-and-tenon construction, the square top block must provide sufficient material for the required joints.
For removable construction, the legs may need accurately positioned threaded fittings or mounting holes.
Before manufacturing, confirm:
- Overall leg height and maximum diameter
- Square top-block dimensions
- Apron depth and thickness
- Intended attachment method
- Mortise or mounting-hole positions
- Wood species and finishing requirements
MayuWorks manufactures turned wooden components according to customer drawings, samples, and specified dimensions. Planning the attachment details early can help furniture makers improve fit, simplify assembly, and reduce unnecessary modifications.
If you’re still deciding which leg design suits your project, explore our guide to Types of Wooden Table Legs for an overview of popular styles and their applications.
Explore our Turned Wood Table Legs or contact MayuWorks to discuss custom manufacturing requirements.
Frequently Asked Questions
What is the strongest way to attach wooden table legs?
There is no universally strongest method. Mortise-and-tenon joints with sturdy aprons are often excellent for permanent solid wood tables, while properly designed wooden corner blocks or metal corner braces can provide reliable removable connections.
Can I attach long table legs directly to a tabletop?
Yes, if the mounting system is designed to resist sideways forces and rotation. However, a basic single-bolt connection without adequate structural support may allow long table legs to wobble.
Do table aprons make a table more stable?
Yes. Properly designed table aprons help resist sideways movement and frame racking. Their effectiveness depends on apron dimensions, joint quality, and the overall table structure.
Are metal corner braces stronger than wooden corner blocks?
Not necessarily. Both can provide secure connections when correctly designed and installed. Their performance depends on bracket or block dimensions, fasteners, wood strength, and construction quality.
Final Thoughts
Securely attaching wooden table legs requires a connection that can resist sideways movement and rotation, not just support vertical loads. Mortise-and-tenon joints, wooden corner blocks with bolts, and metal corner braces can all provide reliable support when properly designed and combined with a suitable apron frame.
The best method depends on your table’s dimensions, intended use, and whether the legs need to be removable. Planning the connection before manufacturing or assembly helps ensure better stability, accurate fitting, and long-term durability.